I, Nida Khaldy, is pursuing a diploma in Graphic Master Plus course from ADMEC Multimedia Institute. This article is based on the topic 'Steps to Map an Artwork Around an Object' which is a part of my Adobe Illustrator training. Initially, I’m going to introduce you to Adobe Illustrator and its importance in the Graphic Designing.
INTRODUCTION TO ILLUSTRATOR
Adobe Illustrator is established by Adobe systems as a vector graphics editor software. It allows you to create attractive and classy graphics, icons and logos using simple shapes and colors. You can even trace the pictures and make freehand drawings in it. These works can be used anywhere including printed pages, blogs, presentations, websites and social media. not only artworks it can also produce good typographic works using effects and styles.
Adobe Illustrator’s Significance in Graphic Designing
Adobe Illustrator has an individual significance in the field of graphic designing. Here are some essential points which will explain its importance in graphic designing.
1. Freedom to create ideas: One has complete freedom to design whatever they want. We can freely express our thoughts on our designs using Adobe Illustrator.
2. Creating Classy Logo: This is a vector-based software which allows us to make different art forms which is an initial level of logo making.
3. Creation of Cartoon Characters: We can create any cartoon character with the help of some tools such as pen tool, color palette and gradient tool in this software.
4. 3D Graphics making: 3d functions in Illustrator allows to create numerous elements and shapes.
5. Alter any image without undermining quality: In this vector-based software we can resize or alter the image size without compromising the quality of the image.
STEPS TO MAP AN ARTWORK AROUND AN OBJECT
You can map the artworks into 3d objects using symbols in Illustrator.
STEP 1:
For mapping an artwork around an object, the text or object must be converted into a symbol first. Click on the window tab that is present on the menu bar, then click on symbols, the symbol palette will thus be open.
Window > Symbols.
STEP 2:
When the symbol palette is open, drag and drop your artwork into it. In the symbol option window, name the symbol (not necessary) and select 'graphics' as the new symbol type.
STEP 3:
Create a symbol’s shape to wrap that all-around. Now it’s time to make a shape for the symbol which you want to wrap around. Then cut the shape in half using eraser tool or any other tool. If you want to make a globe, draw a circle and then cut it into a half with the same technique.
STEP 4:
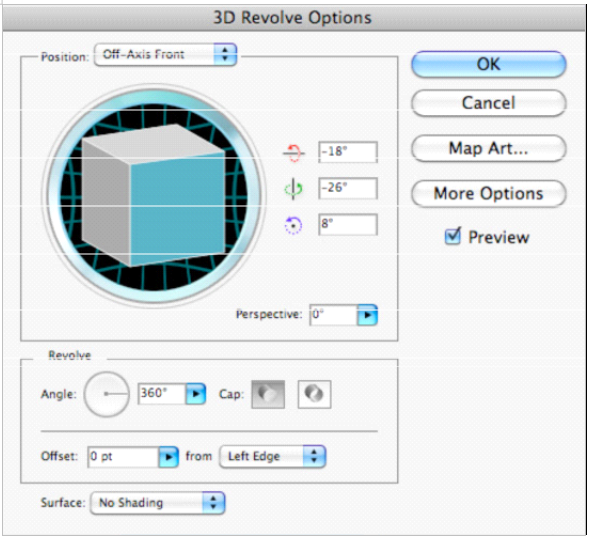
Now select the 3D effect "revolve".
Effect > 3D > Revolve.
After selecting 3D Revolve option you can set the surface with no shading. Then click on map art button as shown in the given picture.
STEP 5:
Then a map art window will be opening, from there select the formerly designated symbol.
You can then resize or move your artwork accordingly. Then click ok to finish.
If you are creating such a logo then after creating it you can actually rotate the globe in the 3-D revolve dialogue to highlight some different part of the globe. Click “ok” in 3D revolve window to apply map art.
TIP: Shaded artwork takes a long time to render, but generally it looks more realistic. Let Artwork box render so that we can check the version that we prefer. Some images will influence and some won’t make big difference. The artwork might look odd in case of transparency.
Conclusion
Thus, mapping an artwork to an object is a great way to enhance your work and give them a 3-dimensional look. I hope my efforts will help you.
To read more blogs you can go through All Adobe Illustrator Blogs.


No comments:
Post a Comment