InDesign is a program for designing print layouts. InDesign is a robust tool which has several typesetting features which allow the users to create fully interactive magazines, e-books, and other digital publications. It has many advanced features than other Adobe Software. With this application, we can wrap text, can create unlimited shapes, logos and much more.
One of the most significant feature
of Adobe InDesign is that users can wrap text around objects of any shape, and
the contours of imported images. If you are interested to design pamphlets,
flyers, eBooks, PDFs, magazines, brochures, and much more, then join best InDesign courses. The Adobe InDesign training video from best Adobe InDesign institutes where
you will learn all important tools for the proper workflow from starting a
project to exporting it. The vital steps which should be followed for wrapping
a text:
Step
1: Open Adobe InDesign. Select a new blank
page by choosing New> Document
option from the file menu or by using short-cut command Ctrl+N through keyboard.
Step 2: The
next step is to select type tool (T) and make a text frame by dragging your
mouse. Then, fill it with the placeholder text or anything you want.
Step 3:
After that make a graphic frame by selecting the rectangle frame tool (F). Drag
your mouse inside the text frame to make a rectangle frame where you want to
place the image.
Then, place your image by choosing
New>Place or by pressing Ctrl+D.
You can fit the content of the image proportionally or even can fit the frame
box according to the content.
Step
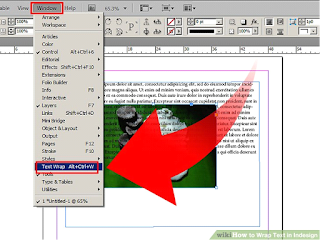
4: In the windows panel, select Text wrap
option to wrap the text. Select “Wrap Around Bounding Box” option from InDesign
Text Wrap panel, if you want to wrap the text around the bounding box. If you
want to display all the controls in the Text wrap panel, then select “Show
Options” from the panel menu. After selection of this option, at times some
white space will appear in your design work.
Step 5:
Choose the Text Wrap panel, and then you can save your file.
HINT: When you place an image onto your InDesign document, it is linked to the original file on your computer. Thus, if the original file is moved or deleted, the image won’t load on you document, and you can’t print it!
Text Wrap functionality not only permits the users to do text
wrap around any object but also offers numerous ways in which an object can be
placed anywhere inside a text block. It can be removed effortlessly in case if
you no longer want to use text wrap around an object. Hope this blog has helped
in some way and now you will be able to create text wrap without any
inhibitions. If you are new or have little bit knowledge about how tools and
functions in Adobe InDesign, and want to take your learning to advanced level
on order to learn certain tools and functions? If yes, then joining Adobe InDesign Training Institutes will
make you learn everything you need to know about the world's industry-standard
graphic design and publication software. At the end of the course, you will
create different kind of projects like poster, look book, annual report etc.
which will be a part of your portfolio and can be showcased at the time of job
interviews.


No comments:
Post a Comment